Showing posts with label attire. Show all posts

Saturday, May 16, 2009

Rock n Roll Wedding Inspiration


These awesome dresses are part of the 2009 Rock ‘N Roll Collection by Designer Claire Pettibone

Chakra ~ Ecru embroidery with nailhead embellishment:

claire-pettibone-rock-n-roll-bride-wedding-dresses-55

Gothique ~ Jeweled corset with velvet and tulle chevron skirt:

claire-pettibone-rock-n-roll-bride-wedding-dresses-44

Midnight ~ Antique embroidery with amethyst straps and black rose:

claire-pettibone-rock-n-roll-bride-wedding-dresses-11

Friday, May 15, 2009

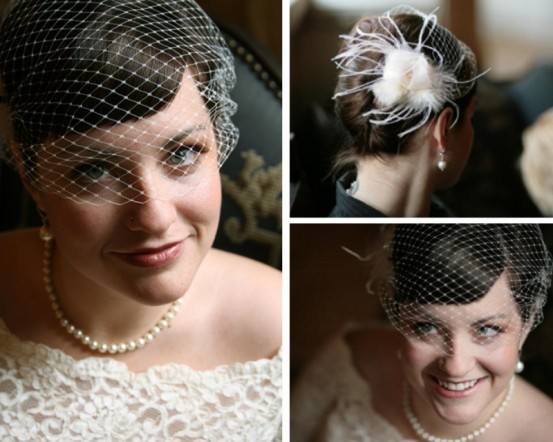
DIY bird cage veil


credit: care04 on theknot.com


credit: care04 on theknot.com

I found a fantastic tutorial online by “care04” (From theknot.com!) who created her own bird cage veil and was nice enough to share the instructions with us!

You will need…

  • 1 yard of Russian Netting (9″ wide for a smaller veil like care04 created OR 18″ wide if you plan to cover your entire face)
  • 2 small combs for a smaller veil to be placed at each side of your head (with optional 3rd small comb to place in center to better hold the veil in place and further shape the netting) OR 1 large comb for a full face veil which would be placed at the top/middle of your head
  • invisible/white/ivory thread, depending on the color of the netting and your preference (Care04 recommended and used button thread)
  • hair pins to further shape veil once finished and placed on your head
  • Scissors
  • Optional: String to use as a guideline when cutting the veil shape

Let’s create a bird cage veil!

  1. Lay out the netting so that the longest part is parallel with your body and decide on the veil shape. (Care04 used string to get an idea of the veil shape she wanted to cut and give the scissors a guideline to follow).
  2. Cut off the hard corners of one side of the veil. Cut along the string line with sharp scissors so that you have one long edge with hard corners and one long edge with a rounded edge.
  3. You will start your sewing at the hard corner and sew along the edge, through the rounded corner and across the top, then back down the opposite rounded corner, and finish at the hard edge opposite to the first hard edge. (This will pull the edges of the veil up so that it is a more rounded shape around your face.)
  4. Using your thread (Care04 used button thread because of its strength), loop it once through a “diamond” of the netting at the first hard corner and make a very small knot so that the thread will hold. Use a running stitch through the open weaves of the netting. (Make sure to thread in between the diamonds that are complete - when you cut your netting, some of the “diamonds” will be cut, so if you thread through those broken holes the thread won’t stay!)
  5. As you pull your thread for the running stitch, bunch up the fabric on the thread (it will be sort of like a drawstring) to your desired width. (Care04 used a 3.5 inch comb, so she gathered it to 3.5 inches - gather to the width of your comb(s)!) When you have gathered to the width you need, finish with a small tight knot.
  6. Next, using your thread sew the bunched edge of the veil to the comb using a looping stitch, through the material and around the top/head of the comb and in between the teeth).
  7. If using 2 small combs and wrapping, repeat step to attach the second comb to the other side of the veil.
  8. Lastly, add embellishments! Scatter pearls or crystals as you see fit, attach feathers or even a flower (a silk gardenia would be pretty!). Be creative! (Note: You may also choose to make smaller embellishments on the veil itself, and then save the bigger ones like feathers and flowers for a separate comb to use along with your bird cage veil. This would allow you to place the larger flower/feather pin to hide pins or combs and also the ability to remove the bird cage veil after ceremony and wear only the flower/feather clip at the reception!)

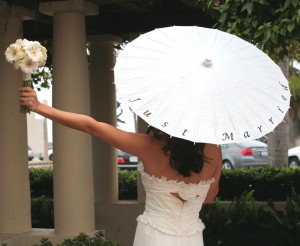
DIY: Hand-painted Parasol

These beautiful hand painted parasols are perfect for a garden or beach wedding.

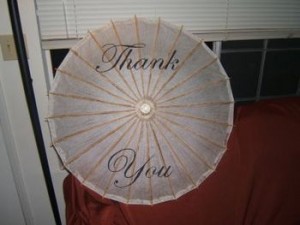
The “Thank You” parasol in a photo would make a great thank you card for after the wedding


You’ll Need..

* Paper parasol in your choice of size - just make sure that the paper is slightly transparent to allow you to see your pattern through it, most brides go with a simple white parasol (See Paper Lantern Store or Oriental Trading (bulk purchase) to order online)
* Acrylic Paints
* Pencil
* Tape
* Fine Paint Brush (Don’t go too cheap here, you’ll want a soft fine brush able to glide along the paper and paint intricate lines…In other words, don’t use the paintbrush from a kids watercolor paint set!)
* Computer/Printer to print pattern
* Optional - Embellishments such as swarovski crystals (and glue!)

Some suggestions for designs…
Just Married
Flowergirl
Bride
Groom
Bridesmaid
Groomsman
We Did!
I Do
Thank you!
Love
Your Monogram
Your Wedding Date

Making the parasols are extremely simple! Just gather your materials and steady your hand..here we go!

1. Decide what you want on your parasol. You will want to prepare your pattern on the computer to use as a guide for painting. How you do this depends on the programs you have available on your computer, however most brides seem to use Microsoft Word to type out the words/letters they want in the font style of their choice. Enlarge the font size (or design) till you get the size you want - you’ll have to play with this (and test print) till you get the size you are looking for. If the lettering/design is small you may be able to fit a word per sheet of paper. Some designs may require one letter per sheet..and some designs (a monogram perhaps?) are so big they may require several sheets of paper taped together. When you’ve successfully printed the letter(s)/design(s) for your parasol in the size you want you are ready for the next step!
2. Take your printed sheet and some scotch tape and GENTLY tape it to the underside of your parasol where you want the design on the sheet to be. The printed design should be face up so it peeks through the see through paper of your parasol - this is why your parasol -must- be see through to some degree and not opaque! This will act as a guide for painting onto your parasol.
3. Gently trace the design with a sharp pencil using the pattern you taped underneath as a guide.
4. Next, begin painting! Take your fine paint brush and begin painting your design using the pattern you traced. guide. Don’t rush this! Be very slow and gentle to fill in the pattern you traced. Some suggest using small strokes to avoid botching the design when you paint over the parasols ridges/bumps. If you are painting with more than one color, be sure to allow the first color (and each thereafter!) to dry before starting a new color.
5. Once your painting has dried you are done! You may now choose to further embellish your design to further customize your parasol. (Some swarovski crystals glued in select areas of the design could be very pretty!)

That’s it!


How to make a wedding garter

Keep in mind that many brides choose to have two garters if they are planning on doing the garter toss. One to throw and one to keep! Some element of blue such as blue beads, trim, lace or ribbon is also often used for the "something borrowed something blue" tradition.

garter bride


Materials
  • Fabric strip - 3 inches wide by one and a half times leg measurement
  • Lace - any lace is fine, this is used as trim, same length as fabric strip
  • Elastic - 1/2" wide
  • Charms, etc - You can add personalized charms, beads or other trims as you wish. These can be sewed on or glued on with a glue gun.

garter materials


Instructions for How to Make a Wedding Garter:

Be sure to measure your thigh where the garter will go. Use this measurement plus 1/2 to get the correct length of fabric and lace trim.

  • Fold fabric strip in half lenthwise with the wrong side out. Sew this edge then turn inside out so the correct fabric side is facing out and the sewed edge is in the center of the fabric tube.

  • garter instructions sew


  • Iron the tube so the seam is in the back center (which will be hidden against your leg) and then sew the lace onto the bottom edge.
  • Slide the elastic into the tube. If this is difficult you can put a safety pin on the end of the elastic to help glide it through. Wrap your bridal garter around your leg and trim the elastic to where it is a comfortable fit. Sew the elastic edges together and finishing by hand-sewing the ribbon and fabric ends together.
  • Lastly, you can sew on additional charms, beads, bows, rosettes or whatever embellishments you like!

  • wedding garter


    From Do It Yourself Weddings