credit: care04 on theknot.com

credit: care04 on theknot.com
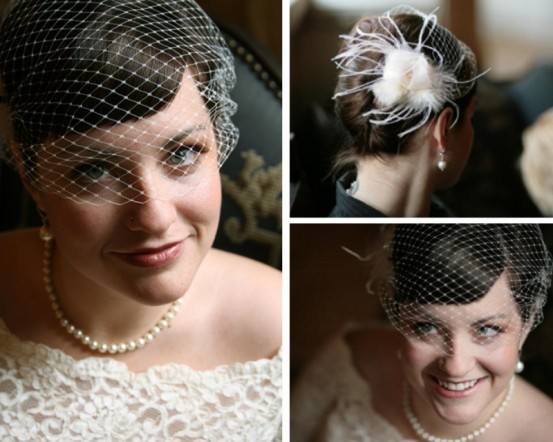
I found a fantastic tutorial online by “care04” (From theknot.com!) who created her own bird cage veil and was nice enough to share the instructions with us!
You will need…
- 1 yard of Russian Netting (9″ wide for a smaller veil like care04 created OR 18″ wide if you plan to cover your entire face)
- 2 small combs for a smaller veil to be placed at each side of your head (with optional 3rd small comb to place in center to better hold the veil in place and further shape the netting) OR 1 large comb for a full face veil which would be placed at the top/middle of your head
- invisible/white/ivory thread, depending on the color of the netting and your preference (Care04 recommended and used button thread)
- hair pins to further shape veil once finished and placed on your head
- Scissors
- Optional: String to use as a guideline when cutting the veil shape
Let’s create a bird cage veil!
- Lay out the netting so that the longest part is parallel with your body and decide on the veil shape. (Care04 used string to get an idea of the veil shape she wanted to cut and give the scissors a guideline to follow).
- Cut off the hard corners of one side of the veil. Cut along the string line with sharp scissors so that you have one long edge with hard corners and one long edge with a rounded edge.
- You will start your sewing at the hard corner and sew along the edge, through the rounded corner and across the top, then back down the opposite rounded corner, and finish at the hard edge opposite to the first hard edge. (This will pull the edges of the veil up so that it is a more rounded shape around your face.)
- Using your thread (Care04 used button thread because of its strength), loop it once through a “diamond” of the netting at the first hard corner and make a very small knot so that the thread will hold. Use a running stitch through the open weaves of the netting. (Make sure to thread in between the diamonds that are complete - when you cut your netting, some of the “diamonds” will be cut, so if you thread through those broken holes the thread won’t stay!)
- As you pull your thread for the running stitch, bunch up the fabric on the thread (it will be sort of like a drawstring) to your desired width. (Care04 used a 3.5 inch comb, so she gathered it to 3.5 inches - gather to the width of your comb(s)!) When you have gathered to the width you need, finish with a small tight knot.
- Next, using your thread sew the bunched edge of the veil to the comb using a looping stitch, through the material and around the top/head of the comb and in between the teeth).
- If using 2 small combs and wrapping, repeat step to attach the second comb to the other side of the veil.
- Lastly, add embellishments! Scatter pearls or crystals as you see fit, attach feathers or even a flower (a silk gardenia would be pretty!). Be creative! (Note: You may also choose to make smaller embellishments on the veil itself, and then save the bigger ones like feathers and flowers for a separate comb to use along with your bird cage veil. This would allow you to place the larger flower/feather pin to hide pins or combs and also the ability to remove the bird cage veil after ceremony and wear only the flower/feather clip at the reception!)
i followed your way and have make a cage for my pigeon..though it was perfectly built but next time i would make it perfect.
ReplyDelete