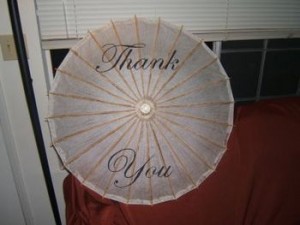
The “Thank You” parasol in a photo would make a great thank you card for after the wedding
You’ll Need..
* Paper parasol in your choice of size - just make sure that the paper is slightly transparent to allow you to see your pattern through it, most brides go with a simple white parasol (See Paper Lantern Store or Oriental Trading (bulk purchase) to order online)
* Acrylic Paints
* Pencil
* Tape
* Fine Paint Brush (Don’t go too cheap here, you’ll want a soft fine brush able to glide along the paper and paint intricate lines…In other words, don’t use the paintbrush from a kids watercolor paint set!)
* Computer/Printer to print pattern
* Optional - Embellishments such as swarovski crystals (and glue!)
Some suggestions for designs…
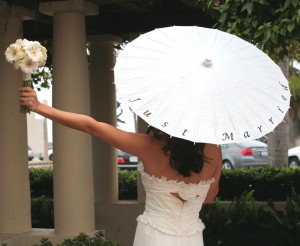
Just Married
Flowergirl
Bride
Groom
Bridesmaid
Groomsman
We Did!
I Do
Thank you!
Love
Your Monogram
Your Wedding Date
Making the parasols are extremely simple! Just gather your materials and steady your hand..here we go!
1. Decide what you want on your parasol. You will want to prepare your pattern on the computer to use as a guide for painting. How you do this depends on the programs you have available on your computer, however most brides seem to use Microsoft Word to type out the words/letters they want in the font style of their choice. Enlarge the font size (or design) till you get the size you want - you’ll have to play with this (and test print) till you get the size you are looking for. If the lettering/design is small you may be able to fit a word per sheet of paper. Some designs may require one letter per sheet..and some designs (a monogram perhaps?) are so big they may require several sheets of paper taped together. When you’ve successfully printed the letter(s)/design(s) for your parasol in the size you want you are ready for the next step!
2. Take your printed sheet and some scotch tape and GENTLY tape it to the underside of your parasol where you want the design on the sheet to be. The printed design should be face up so it peeks through the see through paper of your parasol - this is why your parasol -must- be see through to some degree and not opaque! This will act as a guide for painting onto your parasol.
3. Gently trace the design with a sharp pencil using the pattern you taped underneath as a guide.
4. Next, begin painting! Take your fine paint brush and begin painting your design using the pattern you traced. guide. Don’t rush this! Be very slow and gentle to fill in the pattern you traced. Some suggest using small strokes to avoid botching the design when you paint over the parasols ridges/bumps. If you are painting with more than one color, be sure to allow the first color (and each thereafter!) to dry before starting a new color.
5. Once your painting has dried you are done! You may now choose to further embellish your design to further customize your parasol. (Some swarovski crystals glued in select areas of the design could be very pretty!)
That’s it!

From DIY Wed Central
No comments:
Post a Comment